 EcorisMap
CHAPTER 05
Set Up Maps
The “maps” button opens the Map selection screen. Use it to switch the displayed maps and to add and edit maps. For offline downloads, see Download Maps for Offline Use.
Map selection screen
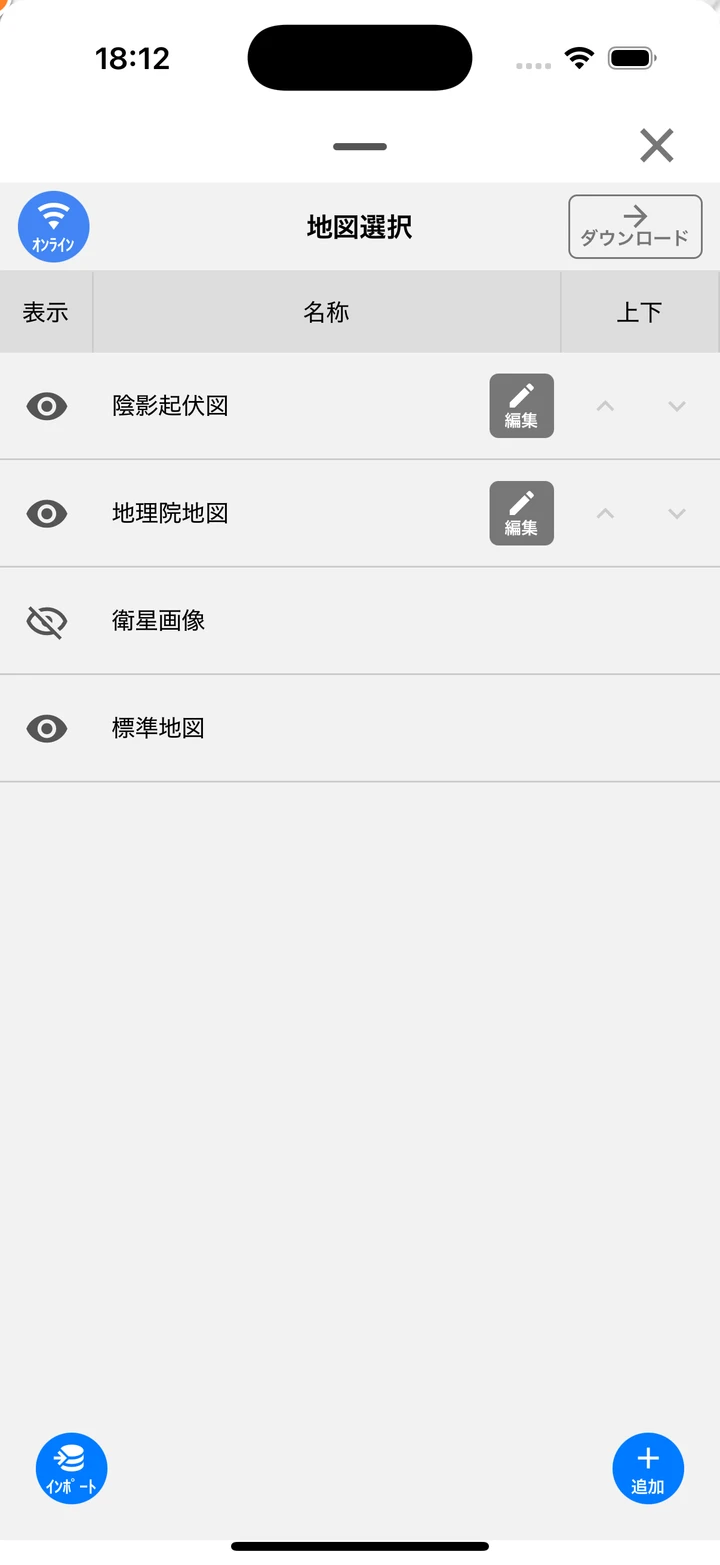
- Visibility toggle (eye icon) — Shows or hides the map. Maps with a transparency setting are displayed over the map below.
- Map name — For PDF maps and PMTiles, tapping jumps to that map’s extent. Long-press to reorder by dragging.
- Edit (pencil) — Opens the Map Edit screen.
- PDF — Appears when a PDF map is specified. Tap it to fetch the PDF again.
- Up/Down — Moves the display order one step at a time. Maps higher up are displayed in front. Using it just below a group moves the map into or out of the group, the same as dragging.
- group — Creates a group (folder) to organize maps. Press the button and enter a group name; the new group is added to the top of the list. Tap the folder icon to expand or collapse it.
- Offline / online toggle (top left) — Switches to offline mode, which displays only downloaded tiles. See Download Maps for Offline Use.
- Download (top right) — Enters download mode. See Download Maps for Offline Use.
- import — Loads map settings (json), PDF maps, and PMTiles files. Map settings replace everything when they contain multiple maps, and are added or updated when single. A geospatial PDF can be used as a map; multi-page PDFs become a separate map per page, and PDFs exported by EcorisMap can also be loaded. For PMTiles, the extent and zoom are set automatically from the file.
- add — Registers a new map. The Map Edit screen opens.
Maps registered from the start
Right after installation, the following four maps are registered.
“Standard map” and “Satellite image” are Google base maps. Only one of them can be displayed, so turning one on turns the other off. Turning both off leaves no base map. These two cannot be edited, deleted, or reordered, and are always fixed at the bottom of the list.
| Map name | Provider | Notes |
|---|---|---|
| Hillshade | GSI | For overlay use at transparency 0.7. On by default |
| GSI map | GSI | Standard map tile. On by default |
| Satellite image | Off by default | |
| Standard map | On by default |
Adding and editing maps (Map Edit screen)
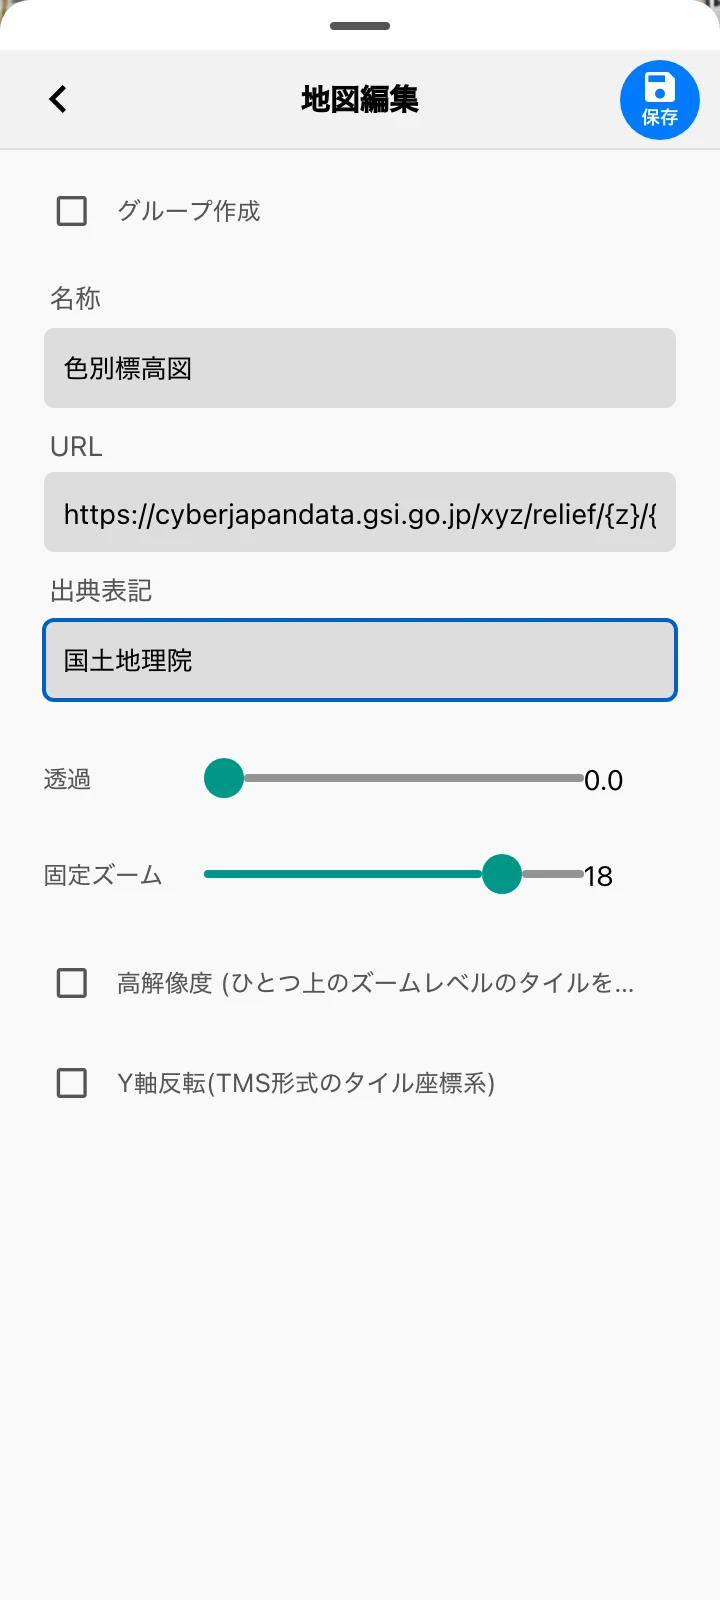
- name — The map name shown in the list.
- Presets (the ”∨” to the right of the name field) — Shown only when adding a new map. Pick a ready-made map such as “現存植生図2024” (vegetation map) or “GEBCO海底地形図(全球)” (GEBCO bathymetry) from the list, and the URL, source, transparency and other settings are filled in automatically.
- URL — The map tile URL. See the table below for supported formats.
- Source notation — Note the source in accordance with the map’s terms of use. It is shown at the bottom right of the screen while the map is displayed. When using maps published externally, always check the provider’s terms of use.
- Transparency (0–1) — The higher the value, the more transparent the map, so you can overlay it on the map below. Overlaying a hillshade map is a typical use.
- Fixed zoom — When you zoom in beyond this value, the tiles at this zoom level are scaled up and displayed. This is called overzoom. Set it to the maximum zoom level the map source provides, and the map keeps displaying with enlarged tiles even when you zoom in further — it does not disappear at zoom levels the source does not serve.
- High resolution — Uses tiles one zoom level higher for a more detailed display, such as showing the GSI map in detail over a wide area.
- Y-axis inversion — Check this when loading TMS-format tiles (with the Y-axis origin at the bottom).
-
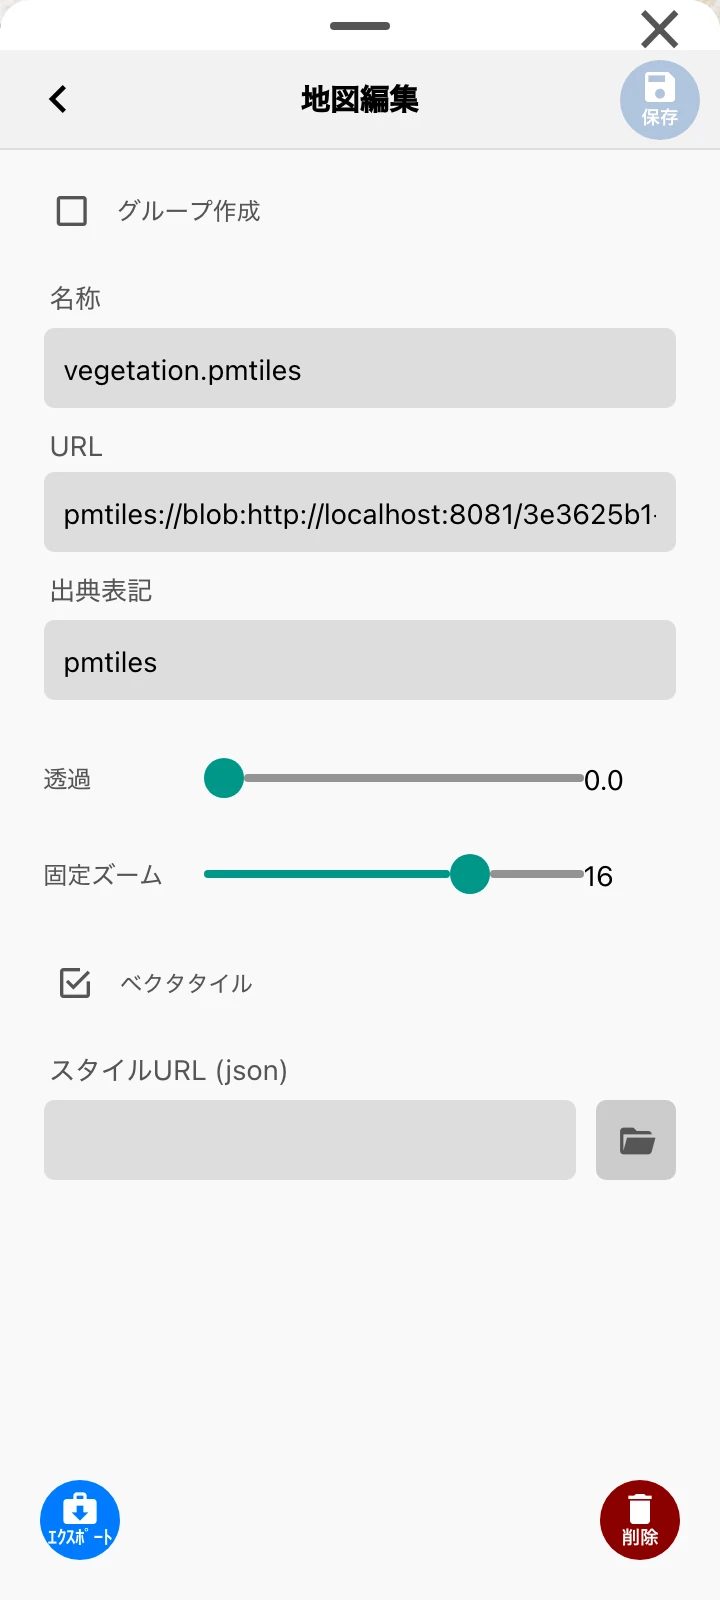
Vector tiles — Appears when a PMTiles URL is specified. Check this when the PMTiles is in vector format. If unchecked, the PMTiles is treated as raster format.
-
Style URL (json) — Appears when the URL is pbf or “Vector tiles” is checked. Specifies the style for vector tiles. It follows the layers section of the MapLibre Style Spec, and only basic items are supported. You can also load a style json from your device using the folder button. See style_sample for examples.
-
export — Writes out this map’s settings as json.
-
delete — Deletes the map settings. A “Do you want to delete it?” confirmation appears. Deleting a group leaves the maps inside it.
-
save (top right) — Saves your changes.
Supported URL formats
You can specify maps in the following formats as the URL. To create and host tiles from your own data, see Map Tile Creation & Hosting.
| Format | How to write the URL |
|---|---|
| Map tiles (XYZ raster) | https://example/{z}/{x}/{y}.png |
| Vector tiles (pbf) | A format including .pbf in the URL |
| PMTiles | https://example/sample.pmtiles (supports both raster and vector). If the URL does not contain .pmtiles, prefix it with pmtiles:// |
| PDF (geospatial) | https://example/sample.pdf (Basic authentication supported via embedded user:pass@) |
| Hillshade (DEM dynamic generation) | hillshade://https://.../{z}/{x}/{y}.png (dynamically generates hillshade from elevation RGB tiles) |
| Color relief (DEM dynamic generation) | relief://https://.../{z}/{x}/{y}.png (dynamically generates color relief, hillshade and contours from elevation tiles) |
Public map tiles useful for surveys
These are the maps commonly used in surveys. Paste the URL with “add” and apply the settings below to use them. Most of them are also available as presets when adding a map. Always check the provider’s terms of use and attribution requirements before using them.
| Name | URL | Source notation | Transparency | Fixed zoom | Y-axis inversion | Vector tiles |
|---|---|---|---|---|---|---|
| Actual vegetation map 2024 | https://map.ecoris.info/tiles/veg2024/{z}/{x}/{y}.png | エコリス、環境省生物多様性センター | 0 | 15 | Off | − |
| Specified plant communities | https://map.ecoris.info/tiles/spPlantComm.pmtilesStyle URL: https://map.ecoris.info/tiles/spPlantComm.json | エコリス、環境省生物多様性センター | 0 | 15 | − | On |
| Mountain hawk-eagle habitat suitability | https://map.ecoris.info/tiles/kumataka/{z}/{x}/{y}.png | エコリス | 0 | 11 | On | − |
| GSI photos (latest) | https://cyberjapandata.gsi.go.jp/xyz/seamlessphoto/{z}/{x}/{y}.jpg | 国土地理院 | 0 | 18 | Off | − |
| GSI photos (1974–1978) | https://cyberjapandata.gsi.go.jp/xyz/gazo1/{z}/{x}/{y}.jpg | 国土地理院 | 0 | 17 | Off | − |
| Relief map (direction independent) | hillshade://https://tiles.gsj.jp/tiles/elev/mixed/{z}/{y}/{x}.png | 産総研シームレス標高タイル | 0.5 | 15 | Off | − |
| Seamless Geological Map of Japan V2 | https://gbank.gsj.jp/seamless/v2/api/1.2/tiles/{z}/{y}/{x}.png | 産総研地質調査総合センター | 0 | 13 | Off | − |
| GEBCO bathymetric chart (global) | relief://https://tiles.gsj.jp/tiles/elev/gebco/{z}/{y}/{x}.png#style=gebco | 産総研シームレス標高タイル(GEBCO)・海しる(海上保安庁) | 0 | 9 | Off | − |
Note: The GEBCO bathymetric chart is generated on the device from elevation tiles — color relief, hillshade and depth contours (the
relief://format). Island and undersea feature names and depth labels are shown as well, and offline download is supported. If you use the sea-land integrated elevation tiles (mixed) for the “Relief map (direction independent)” URL, hillshading also appears on the seafloor.